
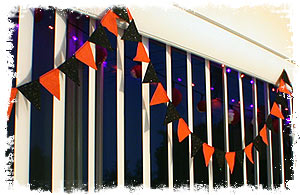
 Transform a couple sheets of felt into a festive banner for your Halloween party. This is a pretty quick and easy Halloween decoration craft that requires few supplies and little skill. The method used here does use a sewing machine, but you could also use embroidery floss and a big needle to do it by hand. It takes a lot longer but you can get crazy with different types of hand stitching.
Supplies Needed:
2 sheets of felt (about 9″ x12″)
Cutting tool (rotary cutter or scissors)
Metal edged ruler (if using rotary cutter)
Self-healing mat (helpful no matter what, necessary if using rotary cutter)
Sewing machine & thread
Embroidery thread (just a few inches)
Large needle
This will yield about a 96″ banner.
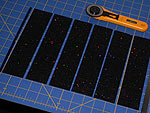
Begin by cutting each piece of felt into 6 strips, each 2″ in width. You will have a tiny strip of remaining felt. Do this for both pieces of felt.
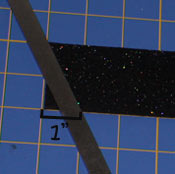
I’m not sure how to describe cutting a perfect triangle, so follow the image! This is where having a self-healing mat with grid pattern is very helpful. If you don’t have one, try drawing up a grid with ruler and marker on a discarded piece of cardboard or poster board.
Make a cut of the same angle on the other side, and you have your first triangle.
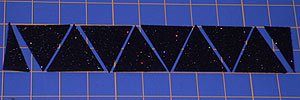
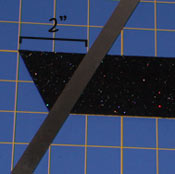
Each row will yield 8 triangles and 2 little triangle scraps. If you’re feeling extra crafty, save up those scraps and make a second, teeny banner. I made a Halloween necklace like these for my cat… who hates me now.

Once you have all your triangles cut out, it’s time to sew one long, straight line. Give yourself several inches of thread at the end for easy handling prior to adding the embroidery thread loops. Start sewing at the beginning corner of the first triangle, keeping the line of stitching as close to the edge as you feel comfortable. (The closer you get to the edge, the more flexibility the banner will have so it could sort of flutter in the breeze. If you’re into that.) Be sure to back-tack a couple stitches.

This step is optional, but you can overlap the triangle edges a little bit in order to make it more durable. Personally, I like the look of leaving about 4 stitches in-between each triangle, but that will make the banner easier to break. Know your audience. If you’ve got pets or children who will be within mouths/arms/paws reach then overlap the triangles. Once you reach the final triangle, back-tack a few stitches and leave yourself a few inches of thread again.

Now you’re going to use embroidery thread to create loops at each end. When you hang up your banner, you will hang your tacks in those. Follow the instructional pictures. Thread, stab, knot profusely.
And you’re done! I noticed that these banners could tangle easily so I made a totally basic, yet very snazzy storage pouch for the off-season. Good use for your Halloween fabric scraps, too.
Notes: This would probably look awesome in other color combos like lime green + purple, or either of those shades + black. Speaking of black felt, as you can probably tell there is some glitter in the stuff I used. It also happened to be thicker, which made it much easier to cut and sew. And if you’ve got a shaped punch that can cut through felt, you could use that instead of cutting triangles. That was my original plan but my Martha Stewart pumpkin shaped craft punch couldn’t cut through felt, even though the package said it would. Arg. Anyway, if you make a mini felt banner, we’d love to see your results!
Drop a comment & leave your mark...
*All comments are moderated*